Export & Import
Export Transactions
ezBookkeeping supports exporting transaction data as CSV (Comma-Separated Values) or TSV (Tab-Separated Values) files, via the command line or from the user interface.
Export Transactions via Command Line
Export Transactions from desktop user interface
- Click "Data Management" in "User Settings" page
- Click the "Export Data" button and select the file type to export all transactions into the chosen file format
If you want to export filtered transactions, go to the transaction list page, hover over the "Import" button, and click "Export" from the dropdown menu.
Export Transactions from mobile user interface
- Tap "Data Management" in "Settings" page
- Tap the "Export Data" button and select the file type to export all transactions into the chosen file format
Import Transactions
ezBookkeeping supports importing files exported by ezBookkeeping via the command line, as well as importing various types of transaction data files from the desktop user interface. The transaction data import tool in the desktop version allows you to preview the imported data and perform batch modifications.
Import Transactions via Command Line
Import Transactions from desktop user interface
- Click "Import" in "Transaction Details" page
- Select the file type and the file you want to import, then click the "Next" button
- Check if the imported transactions are mapped to existing transaction categories, accounts, and tags. Invalid data will be highlighted in red. You can click the pen icon on the left side of each record to modify the transaction category, account or tag of this transaction. You can also click the menu in the upper right corner to batch replace transaction categories, accounts or tags. Finally, select the transactions you want to import by checking the box on the left side, then click the "Import" button.
The following table lists all supported file types and the data contents that can be imported:
| File Type | Income Transaction | Expense Transaction | Transfer Transaction | Transfer Transaction With Different Currencies | Split Transaction | Category Name | Account Name | Tag Names | Timezone | Geographic Location | Description |
|---|---|---|---|---|---|---|---|---|---|---|---|
| ezbookkeeping Data Export File | √ | √ | √ | √ | - | √ | √ | √ | √ | √ | √ |
| Delimiter-separated Values (DSV) File / Data | √ | √ | √ | √ | - | √ | √ | √ | √ | √ | √ |
| AI Text Content Recognition | √ | √ | √ | √ | - | √ | √ | √ | - | - | √ |
| AI Batch Image Recognition | √ | √ | √ | √ | - | √ | √ | √ | - | - | √ |
| Open Financial Exchange (OFX) File | √ | √ | √ | - | - | - | - | - | √ | - | √ |
| Quicken Financial Exchange (QFX) File | √ | √ | √ | - | - | - | - | - | √ | - | √ |
| Quicken Interchange Format (QIF) File | √ | √ | √ | - | × | √ | √ | - | - | - | √ |
| Intuit Interchange Format (IIF) File | √ | √ | √ | - | √ (*1) | √ | √ | - | - | - | √ |
| Camt.052 Bank to Customer Statement File | √ | √ | - | - | - | - | √ | - | √ | - | √ |
| Camt.053 Bank to Customer Statement File | √ | √ | - | - | - | - | √ | - | √ | - | √ |
| MT940 Consumer Statement Message File | √ | √ | - | - | - | - | √ | - | - | - | √ |
| GnuCash XML Database File | √ | √ | √ | √ | × | √ | √ | - | √ | - | √ |
| Firefly III Data Export File | √ | √ | √ | √ | - | √ | √ | √ | √ | - | √ |
| Beancount Data File | √ | √ | √ | √ | × | √ | √ | √ | - | - | √ |
| Feidee MyMoney (App) Data Export File | √ | √ | √ | √ | - | √ | √ | - | - | - | √ |
| Feidee MyMoney (Web) Data Export File | √ | √ | √ | - | - | √ | √ | - | - | - | √ |
| Feidee MyMoney (Elecloud) Data Export File | √ | √ | √ | - | - | √ | √ | - | - | - | √ |
| Alipay (App) Transaction Flow File | √ | √ | √ | - | - | √ | √ | - | - | - | √ |
| Alipay (Web) Transaction Flow File | √ | √ | √ | - | - | - | √ | - | - | - | √ |
| WeChat Pay Billing File | √ | √ | √ | - | - | √ | √ | - | - | - | √ |
| JD.com Finance Billing File | √ | √ | √ | - | - | √ | √ | - | - | - | √ |
- "√" means that the original file contains this data, and it can be imported
- "-" means that the original file does not contain this data
- "×" means that the original file contains this data, but it cannot be imported
- *1: Split transactions will be converted into separate transactions
How to import Delimiter-separated Values (DSV) File or Data
ezBookkeeping supports importing custom data formatted with delimiters. You can separate your data using commas, tabs or semicolons, then save it as a CSV, TSV or SSV file, or paste it directly into the text box, or save it as an Excel workbook file.
- Click "Import" in "Transaction Details" page
- Select "Delimiter-separated Values (DSV) File", "Delimiter-separated Values (DSV) Data" or "Excel Workbook File" as the file type
- For "Delimiter-separated Values (DSV) File", select the file encoding and select the file to import
- For "Delimiter-separated Values (DSV) Data", paste the file content into the text box below
- For "Excel Workbook File", select the file to import
- Then, for "Delimiter-separated Values (DSV) File" and "Delimiter-separated Values (DSV) Data, select the format: "CSV (Comma-Separated Values) File", "TSV (Tab-Separated Values) File" or "SSV (Semicolon-separated values) File". For "Excel Workbook File", select the format: "Excel Workbook File (.xlsx)" or "Excel 97-2003 Workbook File (.xls)".
- Then, choose either "Column Mapping" or "Custom Script" as the hanlding method, and click the "Next" button
If "Column Mapping" is selected as the hanlding method, ezBookkeeping will display the data in a table. You can click the header of each column to set the corresponding mapping. The imported data must include at least three columns: "Transaction Time", "Transaction Type" and "Amount"
- After setting the "Transaction Type" column, click "Transaction Type Mapping" to match each type with the corresponding transaction type in ezBookkeeping
- After setting the "Transaction Time" column, ezBookkeeping will automatically detects the transaction time format. If it shows as "Unknown", click "Time Format" and select the correct format or modify the transaction time in the import file
- After setting the "Amount" column, ezBookkeeping will automatically detects the amount format. If it shows as "Unknown", click "Amount Format" and select the correct format or modify the amount in the import file
- If you set "Transaction Timezone", "Geographic Location", or "Tags" column, you also need to specify the format for transaction timezone and the delimiters for geographic location and transaction tags
- Once all columns are set completely, click the "Next" button
If "Custom Script" is selected as the hanlding method, the next page allows you to handle the import data by writing JavaScript code. You can define a parse function, and ezBookkeeping will pass each parsed row of data along with its index into that function. As shown in the examples, you can return an object to include the data or return null to skip it. When finished, click "Execute Custom Script", and then click "Next" button
At last, you should check if the imported transactions are mapped to existing transaction categories, accounts, and tags. Invalid data will be highlighted in red. You can click the pen icon on the left side of each record to modify the transaction category, account or tag of this transaction. You can also click the menu in the upper right corner to batch replace transaction categories, accounts or tags. Finally, select the transactions you want to import by checking the box on the left side, then click the "Import" button
How to get GnuCash XML Database File
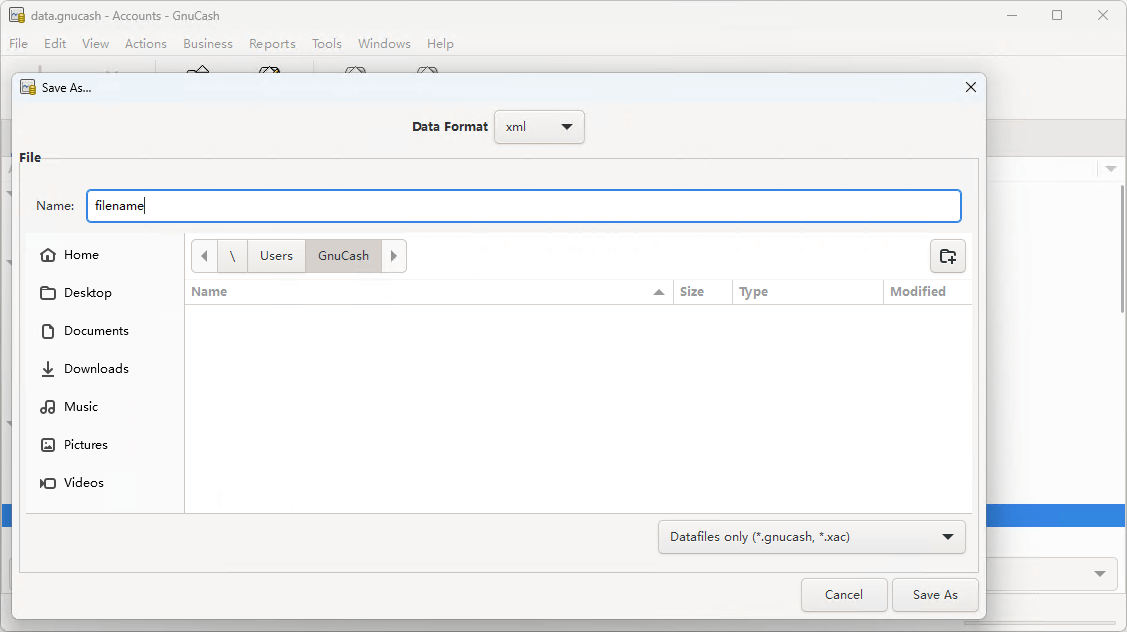
- Click the "File" menu and select "Save As"
- Select "xml" in "Data Format", and save to export the GnuCash database in XML format
How to get Firefly III Data Export File
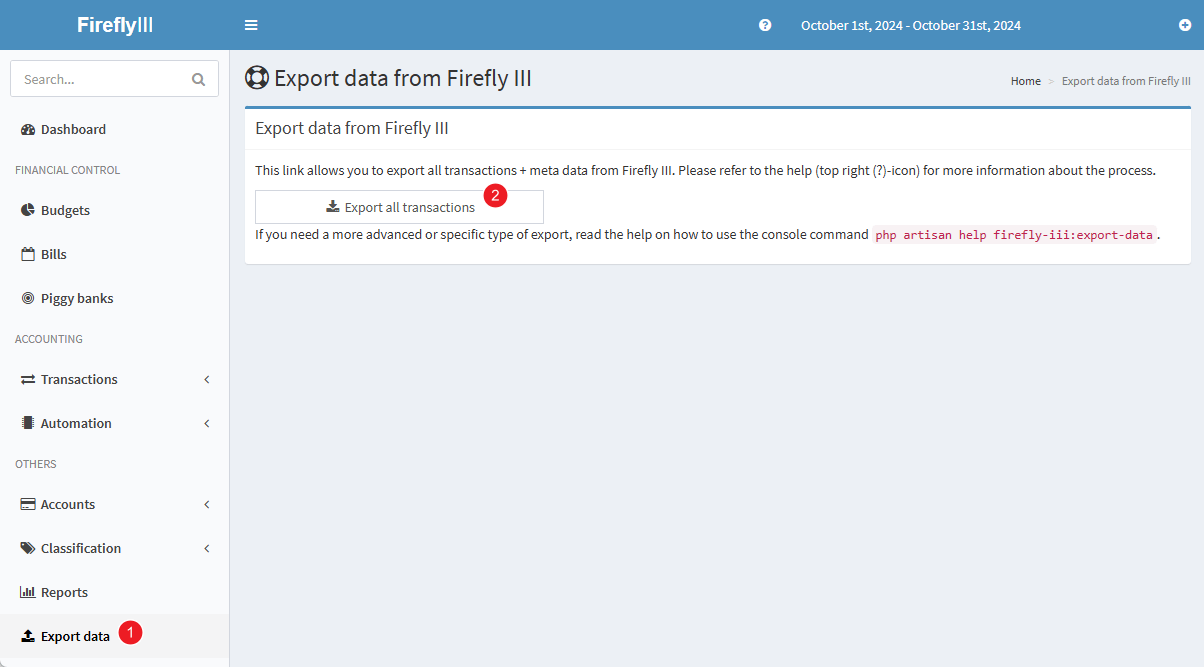
- Click "Export data" in the left navigation bar of Firefly III
- Click "Export all transactions" to export to a csv file